3D printer bed leveling is crucial to print success. Learn all you need to know and how to level a 3D printer bed in this post.
In order to get a successful, high-quality print when using a 3D printer, there are a few crucial factors you must take into account. One of the most significant is a level print bed, which raises the possibility that material will be extruded uniformly across the entire build surface.
Everything you need to know about leveling the bed will be covered in this article, beginning with how to spot issues.
Table of Contents
Preparation
You are almost prepared to make some adjustments now that all of your tools are assembled! We need to make sure everything is tidy before moving on to the hardware.
Clean the Nozzle
First things first, if there is any leftover plastic on the nozzle tip, your bed-to-nozzle gap will be incorrect. With a dry cotton cloth and some luck, the tip can be cleaned easily.
Wipe off the extra plastic after heating the nozzle to the temperature at which the most recent print was made. If that doesn’t work, carefully clean the area around the tip with a brass brush. Just be mindful not to push yourself too hard because the bristles made of the hard brass could harm the nozzle.
Use common sense and adhere to the recommended safety procedures when working close to the hot end, such as donning heat-resistant gloves.
Clean the Build Surface
The surface of your 3D printer bed must be clean, just like the nozzle. We can mainly use a razor blade or a spatula to scrape off any substantial residue and debris from a glass build surface. The blade will also work for other hard build surfaces, but avoid using it on build plates with PEI coatings or other surfaces that could be easily harmed.
We can start washing the build plate after removing any large debris. Cleaning it in the sink with lukewarm water and regular dish soap is effective if it can be taken out. You can use isopropyl alcohol on a paper towel or cloth to clean a non-removable build plate. Finally, use a soft cloth to dry it.
It’s best to avoid using bare hands to touch the freshly built surface as this could cause oil from your skin to be transferred to the plate. Since grease can negatively impact bed adhesion, we don’t want any on the surface. Other methods might be appropriate for various build surfaces, so be sure to check what you have to prevent surface damage.
Hot Or Cold?
If you only intend to print with one set of settings, it doesn’t matter which is hotter for the bed leveling process—cold or hot—bed and nozzle temperatures. Since materials expand slightly when heated, it can help to heat up to those temperatures before leveling in this situation, but it isn’t strictly necessary.
Related Reading: How To Clean A 3D Printing Bed?
How to Level a 3D Printer Bed?
Even for experienced makers, manually leveling a 3D printer bed can be frustrating. However, you’ll quickly master this helpful skill once you comprehend the process’ fundamentals. Here’s how to do it.
Step 1: Create Some Workspace
The corners of the build plate on the majority of FDM 3D printer beds are secured with four movable screws. To increase the separation between the build plate and nozzle, turn each screw a couple of turns. (If “touching up” a leveling job done not too long before, you may not need to do this.)
Step 2: Position the Printhead
Get the nozzle as close to the build plate as possible at this point. Use whatever procedure your printer or control software offers to home your print head to accomplish this.
In the build volume’s space, this will move the nozzle to what the machine perceives to be position (0, 0, 0). The third 0—which stands for the Z coordinate or height—is crucial because it determines where your printer will place the first layer.
Finally, turn off (or unlock) the stepper motors so you can freely move the printhead along the XY plane. Once more, the firmware for your printer should offer this choice. Pushing it too quickly risks charging the motor, so exercise caution.

Step 3: Measure & Adjust
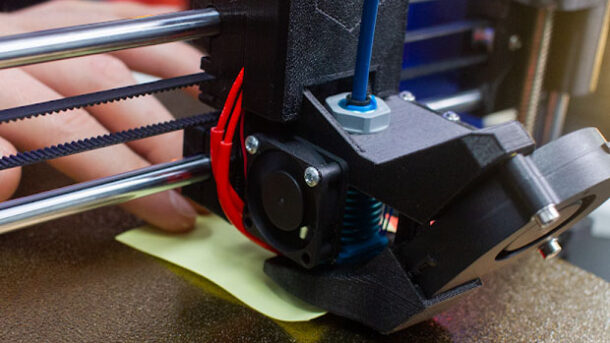
The 3D printer bed should be calibrated to be as level as possible in the middle and at each of its four corners. In theory, the nozzle should just touch the build plate at these locations, and this is why we try to pass something thin between them – such as a piece of paper. Reaching the point just before experiencing resistance while sliding the paper around ensures that the “gap” is correct and consistent at all five locations.
Placing your paper between the nozzle tip and the print bed’s corner after moving the printhead. If there is no resistance when moving the paper back and forth between the nozzle and the bed, tighten the gap by turning the nearest leveling screw. Avoid applying pressure to the bed of the 3D printer (for instance, with your hand), as doing so will cause the bed to incline downward and enlarge the gap. Once you notice a slight drag coming from the nozzle and 3D printer bed, continue adjusting the screw by repeatedly sliding your paper.
On each of the remaining corners, repeat this process. When the corners are okay, move the print head to the middle of the build plate and check that the same resistance can be felt there. If required, reposition the screws.
In case your adjustments to one corner had an impact on the others, check each corner and the center once more. If so, carry out the process again until all five points are level.
Step 4: Inspect the First Layer
It is advisable to print the first layer of a 3D print job before continuing with the rest in order to ensure that the bed has been leveled successfully. If the first layer is successful, it should have a similar appearance across the entire surface. If not, your level might need to be changed further.
Related Reading: Is It Safe To Leave A 3D Printer Running Overnight?
When to Level the Bed
A consistent first layer should result from a level build plate. Visually, it will look like nicely “squished” lines all the way through. When there is a problem with the first layer, it is frequently fairly obvious, and occasionally the cause is an uneven print bed.
Here are a few common signs of an unlevel bed:
- Some areas of the build surface don’t allow the filament to adhere.
- Some locations do not allow the filament to exit the nozzle.
- Over the build surface, the filament’s height and width vary.
- Across the build surface, there are various distances between filament lines.
How Often Should You Level a 3D Printer Bed?
After each print, some people choose to level their 3D printer bed, but this seems unnecessary. Many people choose to level their bed after 5-10 prints or before doing a really long print to ensure better success. With the right techniques, you can cut down the frequency of leveling your bed to once a month or even less.
3D printers are created different, so some machines might need to be leveled more often than others, while some never need leveling and work just fine. It really depends on a number of variables, including how well you assemble the 3D printer and how frequently you move it.
Here are some factors that affect how often you should level your 3D printer bed:
- Using stock springs under the bed that aren’t very firm
- How accurately you are actually leveling the bed
- Printing on an unstable surface that vibrates
- Significant changes in the bed temperature since thermal expansion alters the bed shape slightly
- Your 3D printer’s frame or gantry being off level
- Loose screws or nuts around the 3D printer
You should have to level your bed much less once you account for these factors. When a person levels their bed exceptionally well, they often only require a few small level adjustments to restore the bed’s level.
FAQs
How to Level 3D Printer Bed With Paper?
Move the printhead to a corner of the bed and put your paper between the nozzle tip and the print bed. To tighten the gap, turn the nearest leveling screw if there is no resistance when dragging the paper back and forth between the nozzle and the bed.
Why is My 3D Printer Bed Not Level?
If the bed is not level, one side of your bed may be too close to the nozzle, while the other side is too far away. A level print bed is necessary to get a perfect first layer.
How Do You Level An Uneven Bed?
Simplest fix: Add feet to the furniture
If the uneven floor in question is structurally sound, you can combat its slope by simply attaching adjustable feet—also called “furniture levelers” and easily acquired at any local hardware store or on Amazon to your legs.
Final Words
Finding the ideal distance between the nozzle and the print surface is the biggest challenge when manually leveling a 3D printer bed. Any further and your prints won’t be retained. If you get too close, you’ll hurt the print’s surface.
Fortunately, we don’t need to be laser precise for those of us who are stuck with manual 3D printer bed leveling. Since we are working with millimeter-scale details, getting pretty close to the mark will yield the desired result. Want to learn more about 3D printing, read our posts below: